ACH Blocks and Filters
Overview – ACH Account Blocks
Email notifications regarding exceptions are sent out at approximately 7 a.m. Central Time.
All exceptions must be decisioned by 12:00 p.m. Central Time.
Any ACH transactions presented against your designated accounts, which meet the debit/credit profile that you selected (block all debits, block all credits or block all debits and credits), will be considered exceptions and will be presented as exceptions for your review.
Email Exception Example – ACH Account Blocks
NOTE: Be sure your email service recognizes the email address below so that ACH emails do not go to your junk or spam email folders. PLEASE DO NOT REPLY to these emails.
From: [email protected]
Sent: Monday, October 6, 2025 7:39 AM
To: Customer
Subject: Positive Pay System Notifications (Client exception – Filtered/Blocked Transaction)
A filtered/blocked transaction exception has occurred. Please log on to the System to make a pay/return decision on this exception.Overview – ACH Authorization Filters
Email notifications regarding exceptions are sent out at approximately 7 a.m. Central Time.
All exceptions must be decisioned by 12:00 p.m. Central Time.
As ACH transactions are presented to the bank for your accounts, the company ID of each debit is compared to the company IDs in the ACH authorization filters you requested in your service enrollment. If you requested dollar amount thresholds on your filters, the dollar amount is compared as well. Any ACH debits or credits which do not meet the criteria of your filters are flagged as exceptions.
Email Exception Example – ACH Authorization Filters
NOTE: Be sure your email service recognizes the email address below as a trusted source so that ACH emails do not go to your junk or spam email folders. PLEASE DO NOT REPLY to these emails.
From: [email protected]
Sent: Monday, October 6, 2025 7:39 AM
To: Customer
Subject: Positive Pay System Notifications (Unauthorized ACH Transaction Notification)
The following information has been sent to you as notification from the Positive Pay system.
This is an unauthorized ACH transaction notification. Please log on to the system to review the ACH transaction(s) that posted today.
Check Positive Pay
Overview – Check Positive Pay & Check Positive Pay with Payee Match
Email notifications regarding exceptions are sent out at approximately 7 a.m. Central Time.
All exceptions must be decisioned by 12:00 p.m. Central Time.
Check Positive Pay
Check Positive Pay is a fraud mitigation service that provides early detection of fraudulent, altered, or counterfeit checks through daily verification of checks presented for payment against your check register.
Any posting check transactions presented against your designated accounts which do not meet the criteria of the check issue file will be considered exceptions and will be presented as exceptions for your review.
Check Positive Pay with Payee Match
Payee Match is an enhanced fraud prevention feature within Check Positive Pay. While standard Positive Pay verifies check number, issue date, and dollar amount, Payee Match adds an extra layer of security by also verifying the payee name on the check against the information provided in the issued check file.
Email Exception Example – Check Positive Pay
NOTE: Be sure your email service recognizes the email address below as a trusted source so that the emails do not go to your junk or spam email folders. PLEASE DO NOT REPLY to these emails.
From: [email protected]
Sent: Tuesday, October 6, 2025 7:39 AM
To: Customer
Subject: Positive Pay System Notifications (CLIENT – Exception: Paid item not issued)
A filtered/blocked transaction exception has occurred. Please log on to the system to make a pay/return decision on this exception.
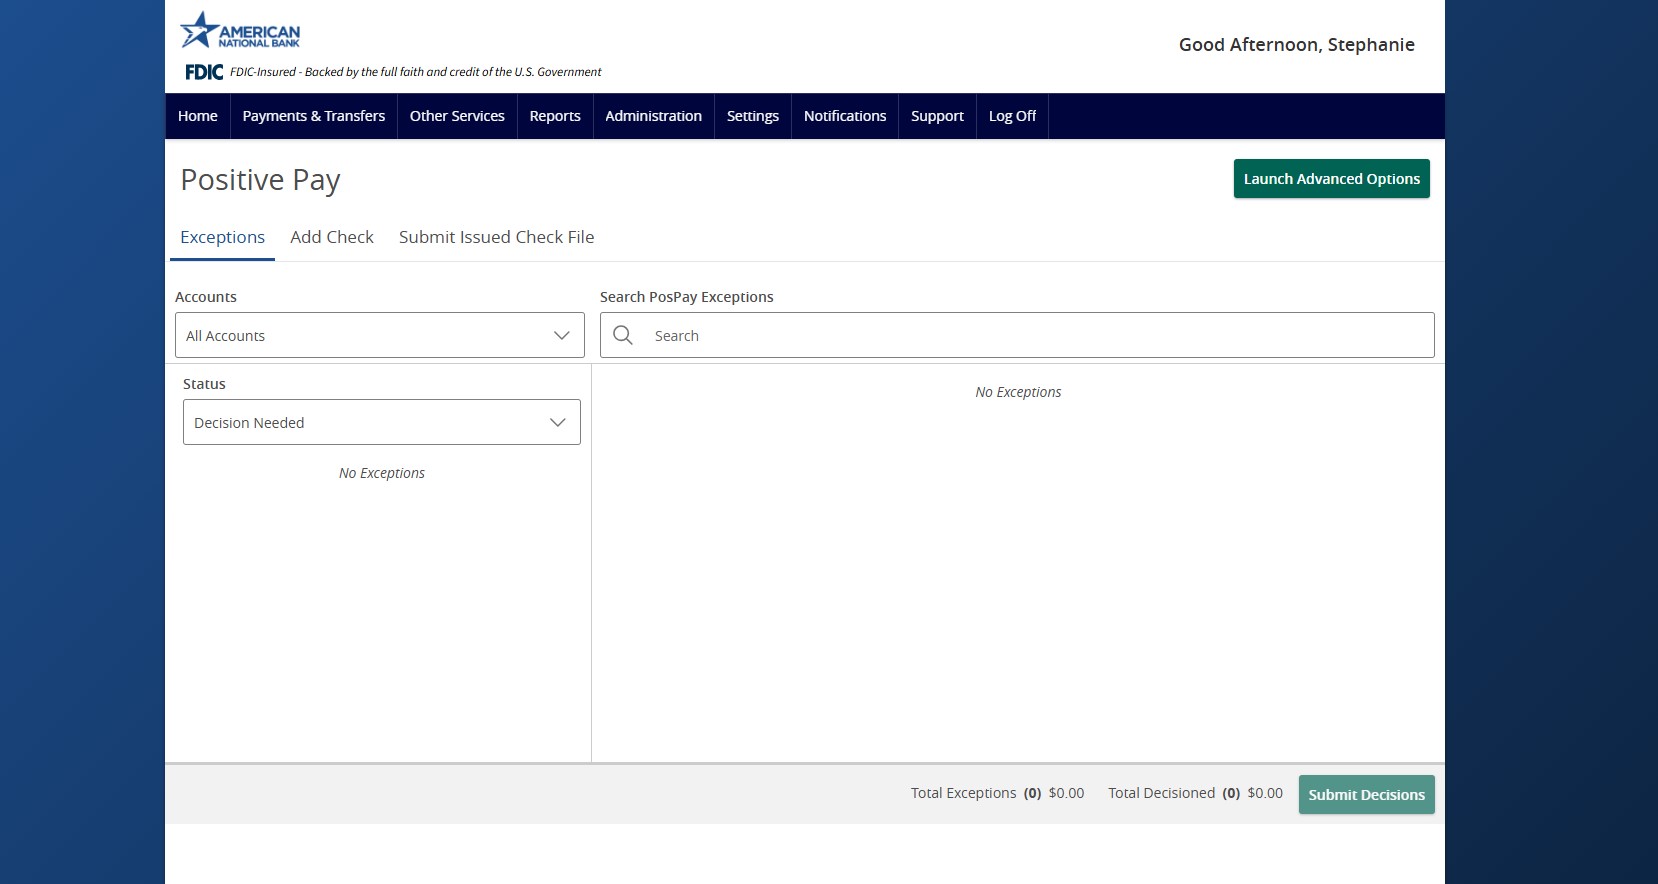
Navigating the system
Accessing Positive Pay
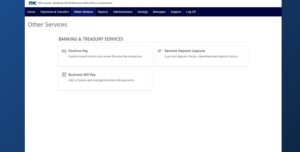
1. Within ANB Go Business, click on the Other Services tab.
2. Click the Positive Pay tile.

3. You will be brought to the Positive Pay screen to exception items, add checks and/or submit issued check files.
4. For other actions or items that you may need to complete or research within the Positive Pay site directly, Click Launch Advanced Options. This will open a new tab in your browser for the Positive Pay portal.

Menu
Once inside the application, menu options are displayed on the left side, as shown in the image below. Depending on what services you are subscribing to, and what your user permissions are, yours may look different. The menu is always displayed on the left side of the screen.

Collapsing/Expanding the Menu & Notifications Icon
To collapse/expand the left-hand menu, click on the icon circled in red below (the three stacked lines). Hovering over the icons in the collapsed menu will expand the menu and allow the user to click on one of their assigned menu options.
A new notifications icon, in blue below (the bell), alerts users of actionable alerts while in the application. Users only receive notifications within the system if the user also receives email alerts from the corresponding item in the list below:
– Exceptions have been created.
– Reminder to process exceptions.
Exception Processing
Quick Exception Processing

The most commonly used function is the Quick Exception Processing function, used to review exceptions and make pay or return decisions prior to the processing window deadline. ACH exceptions, check exceptions or both (depending on the services you are subscribing to) will appear. Pay and return decisions can be made on all items via a single screen.
If you do not decision your items prior to the daily cutoff time, all exceptions will automatically be processed with the default decision pay, or return decision, that your organization selected on your service enrollment form.Viewing Exceptions

1. To view and expand items click on the to view individual items.
2. To decision items:
a. Click the Pay icon to pay the item.
b. Click the Return icon to return the item.

c. You have the option to pay all or return all by clicking Pay all or Return all. These are grouped in sections depending on the reason for the exception.

3. Once you pay or return the item(s), it will automatically move to the Decisioned section and save the decision.Create a New Authorization Filter Utilizing the Add ACH Rule Function
1. Click the Add Rule icon.

2. Enter the Description.
3. SEC Code and Company ID will be pre-filled.
4. Select if you want to authorize Debits only, Credits only, or both Debits and Credits.
5. Optional: Max Allowable Amount. By entering an amount here, in the future when a transaction is presented that’s < (less than or equal to) to this amount, it will be automatically authorized. If the amount is > (greater) than the Max Allowable Amount, the transaction will be presented as an exception.
6. Click Save rule.
NOTES:
1. If you have maximum values set on your authorization filter(s), the unauthorized ACH exception doesn’t indicate whether the item is an exception because there is or isn’t an authorization filter. The system will only create an exception if the amount of this transaction exceeds the current Maximum Allowable Amount.
2. If you add an ACH authorization rule in Quick Exception Processing, it will not automatically authorize the exception presented on the same day that the authorization rule was created. It will apply to future transactions. You will still need to select your pay/return decision on the exception that this was based on in Quick Exception Processing.
3. You can use the add ACH rule to add a new authorization filter, and if one exists with the same Company ID with a different Maximum Allowable Amount, the system will use the filter with the higher Maximum Allowable Amount value.
To view your existing ACH authorization filters currently setup, view the ACH Authorization Report.
Transaction Processing
Submit Issued Check File
Users can use the Submit Issued Check File page to upload issued check files to American National Bank.
NOTE: To use this page, users must have Allow User to add/edit Security Templates transactions enabled in the Security Settings tab on the User Setup page.
After selecting Process File, view additional details regarding the file by selecting the Status column. For example, to view the exceptions on a file that has a status of Processed with Exceptions, select the Processed with Exceptions link.
Account ID— the account ID associated with the issued checks contained within the file. This account ID is displayed in place of the account number on pages within the system and in emails generated by the system. This list only includes accounts that are set up to create either same-day or next-day exceptions. To enable exceptions, use the check exception creation type option on the Account ID Setup page in the Security/Account Administration section of the menu. If no accounts are configured to create check exceptions, all accounts are displayed.
File Mapping Format—the format of the issued check file.
Items in File—the number of checks in the file. This number is used for validation during file processing. If the number entered does not match the actual number of items in the file, the file will be rejected.
Dollar Amount in File—the total dollar amount of checks in the file. This number is used for validation during file processing. If the number entered does not match the actual amount in the file, the file will be rejected.
Issued Date—if the issued check file does not have an issued date within the file, then the issued date must be entered when the file is uploaded.
Once a file is uploaded and processed, a window is displayed indicating the processing status. If the file has not processed within 30 seconds, a message is displayed informing the customer that an email will be sent indicating the file processing status. The file processing status can also be checked online using the Issued Check File Processing Log page. The following is a list of the possible processing statuses:
Unprocessed— the file has been uploaded but has not yet been processed.
Processed— the file was processed successfully.
Processed with Exceptions—the file was processed successfully, but duplicate checks were not loaded.
Rejected— the file was rejected due to one of the following reasons:
– A mismatch between the number of items/amount entered on the page and the number of items/amount contained in the file.
– The file format did not match the selected format.

Issued Check Processing Log
The Issued Check File Processing Log displays a list of all issued check files that have been electronically submitted through the online portal.


Client—the client’s name.
Account ID—the nickname or description that identifies this account to the customer. This account ID is displayed in place of the account number on pages within the system and in emails generated by the system.
File Mapping Format—the file processing type associated with this upload.
Status—the results column from the Issued Check File Processing Log will display one of the following processing statuses:
– Unprocessed—the file has been uploaded but has not yet been processed.
– Processed—the file was processed successfully.
– Processed with Exceptions—the file was processed successfully, but duplicate checks were not loaded.
– Rejected—the file was rejected due to one of the following reasons:
a. A mismatch between the number of items/amount entered on the page and the number of items/amount contained in the file.
b. The file format did not match the format selected.
Items—the number of items in the file.
Amount—the total amount in the file.
Input Date—the date the file was uploaded.
User—the user that uploaded the issued check file.
File Name—the name of the issued check file uploaded into the system.
View File—specific users can be given the ability to download the issued check file that was uploaded by the user. For these users, a View File link appears. When selected, the user has the option to save or view the file. Users can be granted permission on either the User Setup or User Setup (Bank Admins Only) pages. Depending on your configuration, the View File link may not appear for all issued check files.Add New Issued Check
Users can use the Add New Issued Check page if a check was manually written or was otherwise not included in the electronic issued check file that was submitted to ANB. Any checks entered on this page in the current session are displayed in the table below.
NOTE: To use this page, users must have Allow user to add/edit transactions enabled in the Security Settings tab on the User Setup page.
Account ID—the nickname or description that identifies this account to the user. This account ID is displayed in place of the account number on pages within the system and in emails generated by the system.
Check Number—the check number of this item.
Amount—the amount of the check.
Issued Date—the issued date for this check.
Issued Payee—the issued payee name for this check.
Auto-Increment Check Number—checking this box increments the check number by one after each check submission.Void a Check
Use the Void a Check page to void an issued check.

Account ID—the nickname or description that identifies this account to the user. This account ID is displayed in place of the account number on pages within the system and in emails generated by the system.
Check Number—the number of the issued check.
Check Amount—the amount the check was written for.
Issued Date—the date the check was issued.
NOTE: All three fields (Check Number, Check Amount, and Issued Date) are required to void a check.Check Search
Use the Check Search page to search for specific transactions.
NOTE: If a check is converted to ACH, it will appear in ACH Transaction Search instead of this page. Checks are converted to ACH if the transaction has a check number and is assigned one of the following SEC Codes: BOC, ARC, POP or RCK.
Check Search Page:
Account ID—optionally select a specific account. If no accounts are selected the system will search through all available accounts assigned to the corporate user.
Check Status—the status of the check you would like to run reporting for.
Check Number From/Check Number To—Search for transactions based on a check number range. If you are searching for a specific check number, enter the number in both fields.
Date—the type of date you would like to run the Check Search report for.
Date From/Date To—To search for transactions based upon the date or date range the item was excepted. If you are searching for a specific date, enter the date in both fields.
Amount From/Amount To—To search for transactions based on a check amount range. If you are searching for a specific amount, enter the amount in both fields.
Decision—limits the search to a specific pay/return decision.
Reason—limits the search based upon the reason that was selected.
Issued Payee—limits the search to specific payee names. You can enter all or part of the payee’s name.
Include Reversals—when enabled, the search includes reversals.
Results page
You can perform the following actions on this page:
– Drag a column header to reorder.
– Select the search icon ( ) to filter and search all results or select a specific column to search within.
– Select the columns icon( ) to select or remove columns from the report.
– Select the export icon( ) to export the search results to a Microsoft Excel, PDF, or CSV file.
– Select the options icon ( ) on an individual search result to perform one of the following actions:
– View check images—displays an image of the selected check. You can change the view and download a PDF version of the image from this window.
– View record—opens an individual history item for additional details on the change.
– Edit record—opens the record for editing.
– Delete record—removes the record.

The following columns appear on the Check Search page:
Account ID—the nickname or description that identifies this account to the user. This account ID is displayed in place of the account number on pages within the system and in emails generated by the system.
Check Number—the check number of this item.
Amount—the amount of the check that has been presented for payment.
Issued Payee—the issued payee name for this check.
Issued Date—the issued date for this check. On Paid Not Issued exceptions, the paid date is defaulted into the issued date field.
Paid Date—the paid date for this check.
Current Status—the status of the transaction:
– Issued—displayed on items that are flagged as issued by the system.
– Exception—displayed on items that are flagged as exceptions by the system.
– Returned—displayed on items that are flagged as returned exceptions by the system.
– Paid—displayed on items that have been previously paid.
– Stop Payment—displayed for checks that have been stopped with a stop payment.
– Reversal—displayed on items that have been paid and reversed. An item is considered a reversal if the transaction file has a reversal code set for that item.
– Void—displayed on items that have been voided.
– Blank— displayed on an item that is an outstanding check.
Account Number—the associated account number. The first four numbers will be automatically masked.
Input Date—the date the issued item was entered into the system.
Exception Date—the date of the exception.
Void Date—the date the check was voided.
Decision—the decision for this exception item.
Reason—the reason associated with the exception.
Decisioned By—the user who performed the decision. Transactions that are automatically decisioned by the issued check file display as <username> (via issued check file).
Trace Number—a unique transaction ID number that is generated by the core processing system.
Reversal—indicates if the item was reversed.
Stop Pay Status—indicates whether a stop payment has been placed on the item.
Notes—any notes associated with the item.ACH Transaction Search
The ACH Transactions Search screen is used to search for specific transactions using dynamic selection criteria.

Account ID: Optionally select a specific account. If no accounts are selected the system will search through all available accounts assigned to the corporate user.
Paid Date From: The beginning date used in the date range.
Paid Date To: The end date used in the date range.
SEC Code: To search for transactions based upon the ACH Standard Entry Class (SEC) code, select an SEC Code from the list.
Results:
Select the “Download” icon in the upper right of the results screen to export your report to PDF or EXCEL.
NOTE: The default reports do not all have all boxes checked. Click the box shown below, in the upper right part of the Results screen, to see if there may be additional columns not displayed that you would like to include. Uncheck any columns you would like to exclude.
Transaction Reports
Daily Checks Issued Summary
The Daily Checks Issued Summary report is an easy way to see how many checks were issued on any given day and their totals. The dynamic selection criterion allows the user to fine tune the report to their specific needs. This includes both manually loaded checks and checks uploaded through an issued check file.

Account ID—the nickname or description that identifies this account to the user. This account ID is displayed in place of the account number on pages within the system and in emails generated by the system.
Issued Date From—the beginning date to search for a range of checks.
Issued Date To—the ending date to search for a range of checks.
Check Count—the number of checks issued.
Amount Total—the total amount of the checks issued on the specified date.Stops & Voids Report
The Stops and Voids report page allows you to create a report of checks that have been stopped or voided. Select items by Issued Date, Void Date, Stop Placed Date, Item Stopped Date, or Issued Payee.

Account ID—the nickname or description that identifies this account to the user. This account ID is displayed in place of the account number on pages within the system and in emails generated by the system.
Status—filter the results to specific statuses of stops and voids:
– Void—items that have a status of void.
Check Number From—the beginning check number used to search for a range of checks.
Check Number To—the ending check number used to search for a range of checks.
Date—the date you would like to run the Stops and Voids report for.
Date From—the beginning date used in the date range.
Date To—the ending date used in the date range.Exception Items
The Exception Items report filter screen allows the user to generate a report of items that were flagged as exception items. Optionally select items that meet specific criteria. Criteria can include: Exception Date, Exception Type, pay/return Decision or return Reason.

Account ID: The account ID is the nickname or description that identifies this account to the user. This account ID is displayed in place of the account number on screens within the system and in emails generated by the system.
Exception Date From: The beginning posted date used to search for a range of exceptions.
– Transaction Type: ACH
– Check Number From: Not required
– Check Number To: Not required
Decision: The decision for this exception item.
Reason: The reason associated with the exception.
To view a check image, on the right end of the row where the check is, click on the three vertical dots:
A dropdown appears. Select View check images to see the check image.
Select the Download icon in the upper right of the results screen to export your report to PDF or EXCEL
NOTE: The default reports do not all have all boxes checked. Click the box shown below, in the upper right part of the Results screen, to see if there may be additional columns not displayed, that you would like to include. Uncheck any columns you would like to exclude.Stale Dated Checks
The Stale Dated Checks report allows the user to create a report of stale dated checks. A check is considered stale dated based upon the Stale Dated Check Days defined in the Retention Settings tab of the System Setup page. Select items by issued date, input date, as of date or issued payee.

Account ID—the nickname or description that identifies this account to the user. This account ID is displayed in place of the account number on pages within the system and in emails generated by the system.
Stale Dated as Of—to create a report of stale dated checks “as of” a specific date in the past, enter a date in this field.
Check Number From—the beginning check number used to search for a range of checks.
Check Number To—the ending check number used to search for a range of checks.
Issued Date From—the beginning issued date used to search for a range of checks.
Issued Date To—the ending issued date used to search for a range of checks.
Input Date—the date the issued item was entered into the system.
The date is followed by (M) if the check was not loaded via an issued file upload, which means it was entered into the system in some other manner. Examples would be a check being manually input by a user, or a paid not issued exception item that is paid.Payee Match Report
The payee match report page generates an online report using dynamic selection criteria. Select items by issued date, paid date, check number or issued payee name.

Account ID—the nickname or description that identifies this account to the user. This account ID is displayed in place of the account number on pages within the system and in emails generated by the system.
Account Number—the account number associated with the transaction.
Check Number—the check number of this item.
Amount—the amount of the check that has been presented for payment.
Issued Payee—the issued payee name for this check.
Paid Date—the posting date of the check.
Issued Date—the date the check was issued.
Payee Match Result —This is the result of the payee match detection. If listed as verified, the system was able to match the payee. If listed as anything else, the system had an exception and couldn’t validate the payee.
Systems Reports
Transaction Filter/Block Report
The Transaction Filter/Block report displays a listing of all account block filters.
NOTE: This report will only display rules for the accounts that the user has access to.
ACH Authorization Rules Report
The ACH Authorization Rules report displays a listing of all pre-authorized rules.
NOTE: This report will only display rules for the accounts that the user has access to.
Client Setup & Administration
Adding a New User
1. Click on the Administration tab within ANB Go Business.
2. If you have the Manage User Roles tile, click on Manage User Roles. If not, click on Manage Users.
3. If you clicked Manage User Roles, follow the steps below. If not, proceed to the next step.
– Locate the User role you would like to grant Positive Pay permissions to.
– Click the icon.
icon.
– Click on the Features tab.
– Within the Search box, type Positive Pay.
– Toggle on the Allow Positive Pay and Enabled Positive Pay SSO features.
– Click Save.
4. If you clicked Manage Users, follow the steps below. If not, proceed to the next step.
– Locate the user you would like to grant Positive Pay permissions to.
– Click the icon.
– Click Assign Rights.

– Click on the Features Tab.
– Within the Search box, type Positive Pay.
– Toggle on the Allow Positive Pay and Enabled Positive Pay SSO features.
– Click Save.
5. Follow the steps below to add the user directly into the Positive Pay application.
6. Within ANB Go Business, click on the Other Services tab.
7. Click the Positive Pay tile.
8. Click Launch Advanced Options. This will open a new tab in your browser into the Positive Pay portal.
9. In the left-hand menu, under Client Setup & Administration, select User Setup (Client).
10. Under the User Setup section, click Add New.
11. On the Contact Information tab, enter the First Name, Last Name, Email Address and Primary Phone Number of the new user.
12. Click the Security Settings tab.
13. Fill out the User Name, Password and Verify Password fields:
– User Name: Enter the first initial followed by the last name of the user (i.e., JDoe).
– Password/Verify Password fields: Type in a Temporary Password (i.e., Welcome1!).
NOTE: These credentials will need to be communicated to the new user. The new user will only need to enter these credentials one time to link the single sign-on between ANB Go Business and Positive Pay.
14. Fill out the Assigned Account section:
– Select the appropriate accounts in the Available box under client ID. To move the accounts to the Assigned box, click the account you would like to add.
– If you would like to add all accounts, select Add All.
– If you would like all new accounts to automatically be added to this user, select Assign all new accounts to this user.

15. Fill out the Transaction Data User Rights section:
a. For the Allow user to add/edit transaction & Allow user to download issued check files permissions, check the appropriate option:
– If the user should be able to import an issued check file or decision exceptions, check the box.
– If the user shouldn’t be able to import an issued check file or decision exceptions, leave the box unchecked.
b. For the Check Exception Type(s), select the appropriate option:
– Select Cannot view exceptions or make decisions if the user should not be to view or make check exceptions.
– Select Can view exceptions if the user should be able to only view check exceptions.
– Select Can view exceptions and make decisions if the user needs to view and make check decisions.
c. For ACH Exception Type(s), select the appropriate option:
– Select Cannot view exceptions or make decisions if the user should not be to view or make check exceptions.
– Select Can view exceptions if the user should be able to only view check exceptions.
– Select Can view exceptions and make decisions if the user needs to view and make check decisions.

16. Fill out the Setup User Rights section:
a. Check Allow user to add ACH Authorization Rules in Quick Exception Processing if the user should be able to add an ACH company to your company’s authorized ACH company list.
b. Check Allow user to add/edit ACH Authorization Rules in ACH Authorization Rules if the user should be able to add or edit an ACH company in your company’s authorized ACH company list.
c. Check Allow user to add/edit Security Templates if the user is an admin.
17. If a user is ever locked out, the User Locked box will be checked. To unlock a user, uncheck this box.
18. Select the Menu Settings tab and select the appropriate option:
a. To assign all permissions, select option with (main template) in the name under User Security Template.
b. To assign specific permissions, select Create new template in User Security Template and create a Template Name.
c. Check all the options that are applicable to that user in the Menu options this user can access and utilize the table below to check the appropriate menu options the user should be able to access. NOTE: The options may be different depending on what your access is set up for.
19. Use the table below to check the appropriate menu setting the user should have access to.
20. Select the System Messages tab.
a. To assign all email notifications to the user, select All Email in the User Notification Template dropdown.
b. To assign specific email notifications to the user, utilize the table below to check the appropriate Message options the user can receive via email.
21. Select Submit to create the user.Copy an Existing User
If you are adding a user with the same or similar profile as an existing user, you can use the Copy function and modify only those things that are different about the new user.
NOTE: You will still need to fill out the Contact Information & Security Settings tabs for the new user.Unlock an Existing User

1. Change User Status from Active to All.
2. Locate the user you would like to unlock.
3. Click Edit.
4. Click on the Security Settings tab.
5. Unclick User Locked.
6. Click Submit.Archiving an Existing User
1. Locate the user you would like to archive.
2. Click Edit.
3. In the Contact Information tab, locate to Archive User check box.
4. Click the Archive User check box.
5. Click Submit.
Additional resources
-
Positive Pay – Submit Issued Check File
Read moreUse the Submit Issued Check File page to upload issued check files to American National Bank.
-
Positive Pay – Quick Exception Processing
Read moreThere are two ways to process exceptions – from ANB Go Business or the full Positive Pay site.
-
Positive Pay – Check Search
Read moreFollow these instructions to search for a check in Positive Pay.